es6 总结
let、const 在es6之前的作用域分为:全局作用域、函数作用域,而在es6中出现了一个块级作用域
var:变量声明提升、可重复定义、全局变量挂载到 window
let(块级变量声明):
1 没有变量声明提升、不能重复定义、不挂载到
2 声明的变量和 {} 配合产生块级作用域 - 生命在大括号内部的变量无法在外部使用
3 产生临时 Temporal Dead Zone (临时死区)
4 解决闭包问题(ES6规范后引入的)
const(块级变量声明):
其存储量的空间不可以被改变、其余和 let 一样
总:先 const 再 let
spreed&rest … 展开 收集 运算符:
写:function test (...arg) {}; test(1, 2, 3); —收集作用
读:var arg = [1, 2, 3]; console.log(...arg); —展开作用
对于这个 … ,es6 中可以处理数组,es7 中可以处理对象
这里还有个方法 Object.assign ,可以克clone,但是是浅clone:
1
2
3
4
5
6
7
8
9
10
let obj1 = { name: 'vs' } let obj2 = { value: 'more' } console .log( Object .assign({}, obj1, obj2) );
destructuring 解构,也就是结构化赋值,其实我觉得就是两者对比,然后把相同位置的内容赋值过去。当然也可以设置默认值,当对面不存在这个值得时候就用默认值
1
2
3
4
5
6
7
8
9
10
let obj = { name: 'hemuyi' , age: 18 } let {name, age, position = 'wh' } = objconsole .log(name, age, position)
箭头函数 箭头函数减少了很多代码量,当然不止这个作用,对于闭包它也可以很好的处理
箭头函数特点:
1 不用写 function 关键字
2 只能作为函数使用,不能 new, 没有原型
3 参数名不能重复
4 返回值可以不写 return,但要配合 {} 使用
5 内部 arguments this 由定义时外围最接近一层的非箭头函数的 arguments 和 this 决定其值
1
2
3
4
5
6
7
8
9
10
11
12
13
14
function test (a, b ) return a + b } test(1 , 2 ) var test2 = (a, b ) => a + btest2(1 , 2 ) var test3 = (a, b ) => ({a : a, b : b})test3(1 , 2 )
高阶函数的时候:
1
2
3
4
5
6
7
8
9
10
11
12
13
function sum1 (x ) return function (y ) return function (z ) return x + y + z } } } sum1(1 )(2 )(3 ) var sum2 = x =>z =>sum2(1 )(2 )(3 )
总:这个要灵活使用好啊,可以方便很多
ES5 - Object.defineProperty 这个方法可直接在一个对象上定义一个新的具有详细描述的属性,或者修改一个对象的现有属性, 并返回这个对象。
使用:Object.defineProperty(对象,属性,描述符);
使用规则:
数据描述符:
value: ‘xxx’属性值。 默认‘’
writable:true 是否可写。默认false
configurable:true 是否可配置。默认false
enumerable:true 是否可枚举。默认false
存取描述符:
set:function(){} 属性访问器 进行写操作时调用该方法
get:function(){} 属性访问器 进行读操作时调用该方法
数据描述符例子:
1
2
3
4
5
6
7
8
let obj2 = Object .defineProperty({}, 'name' , { value: 'he' , writable: true , configurable: true , enumerable: true }) console .log(obj2.name)
上面这种是产生一个新对象,但也可以对已定义的对象使用这种方法,但要注意,如果是普通方式定义的对象,则 writable configurable enumerable 这三个属性是有的,并为 true,还有,若是已定义过的属性,则会覆盖
1
2
3
4
5
6
let obj3 = { name: 'he' }; Object .defineProperty(obj3, 'name' , { value: 'qi' })
存取描述符例子:
1
2
3
4
5
6
7
8
9
10
11
12
let nameVal = 'he' let obj4 = Object .defineProperty({}, 'name' , { configurable: true , enumerable: true , get () { return nameVal }, set (val) { nameVal = val } }) obj4.name = 'qi'
一般对象中也可以使用 get set ,如下,要注意是下面这样的,所以在一般对象中定义时谨慎使用,也可能是我对这种还不太熟悉。。。
1
2
3
4
5
6
7
8
9
10
11
12
var obj5 = { val: 'hemuyi' , get name () { return this .val }, set name (val) { this .val = val } } console .log(obj) obj5.name = 10 ; console .log(obj5)
ES5 - 数据劫持 我觉得就是数据监控的过程,然后在监控到数据变化时做一些处理
es5 中数据劫持的例子:
1
2
3
4
5
6
7
8
9
10
11
12
13
14
15
16
17
18
19
20
21
22
23
24
25
26
27
28
29
30
31
32
33
34
35
36
37
38
39
40
41
42
43
44
45
46
47
48
49
50
51
52
53
54
55
56
57
58
59
60
61
62
63
<input type="text" id='demo' /> <div id='show' ></div > <script> var oDiv = document .getElementById('show' ); var oInput = document .getElementById('demo' ); var oData = { valueObj: { value: 'duyi' , name: 'haha' }, sex: 'aaa' }; oInput.oninput = function ( oData.value = this .value; }; function upDate ( oDiv.innerText = oData.valueObj.value; } upDate(); function Observer (data ) if (!data || typeof data != 'object' ) { return data; }; Object .keys(data).forEach(function (key ) definedRective(data, key, data[key]); }); } function definedRective (data, key, val ) Observer(val); Object .defineProperty(data, key, { get () { return val; }, set (newValue) { if (newValue == val) return ; val = newValue; upDate(); } }) }; Observer(oData); console .log(oData.value); oData.valueObj.value = 'haha' ; oData.aa = 10 ; </script>
这样就实现了数据监控,进而双向绑定,只能对对象这样操作,但是,但是 ,当在 Observer(oData); 后给 对象 oData 进行 oData.aa = 10 ,此时并不会监控到这个操作,这个属性是后加的,Object.defineProperty 并不能解决这个问题,要解决这个问题,请看 Proxy Reflect
而在 vue 中稍微有点不同, 若是要监控数组,大体是这样实现的:
1
2
3
4
5
6
7
8
9
10
11
12
13
14
15
16
17
18
19
20
21
let arr = []; let {push} = Array .prototype; function upData ( console .log('更新' ); }; Object .defineProperty(Array .prototype, 'push' , { value: (function ( return (...arg ) => { push.apply(arr, arg); upData(); } })() }); arr.push(1 , 2 );
至此,就可以对这个数组的push方法进行监控了,vue 中大体是这样实现的
ES6 - Proxy Reflect 首先,这两个目前兼容性不是很好
例子:
1
2
3
4
5
6
7
8
9
10
11
12
13
14
15
16
17
18
19
20
21
22
23
24
25
26
27
28
29
30
31
32
33
34
35
let oData = { val: 'duyi' , _val: 'aaaa' } let oProxyData = new Proxy (oData, { set (target, key, value, receiver) { Reflect .set(target, key, value); upDate(); }, get (target, key, receiver) { return Reflect .get(target, key); }, has (target, key) { return key.indexOf('_' ) != -1 ? false : key in oData; }, deleteProperty () { } }); console .log( delete oProxyData.val );console .log( oProxyData.val );oProxyData.val = 10 ; function upDate ( console .log('更新了' ) } oProxyData.name = 20 ;
总:监控到对象的变化,哪怕是后来新加的属性
ES6 - Class 基本内容: class 是构造函数的一种写法;方法写在原型上;不具有函数声明整体提升(明确遵守先定义后使用)
constructor 私有属性、 公有属性(原型上的属性)、 静态属性(函数属性):
1
2
3
4
5
6
7
8
9
10
11
12
13
14
15
16
17
18
19
20
21
22
23
24
25
class Plane1 static alive () { return true } constructor (name) { this .name = name; this .age = 18 ; } fly () { console .log('fly' ) } } Plane(); Plane.alive() let oP1 = new Plane1('qi' )oP1.name oP1.fly()
总:
1 constructor 里的是私有属性,如:name age
2 公有属性(原型上),如:fly
3 静态属性并不是运行在 oP,而是函数本身 Plane
extends,继承:
1
2
3
4
5
6
7
8
9
10
11
12
13
14
15
class Plane2 extends Plane1 constructor (name) { super () this .logo = 'yi' } speed () { console .log('sousousou' ) } } let oP2 = new Plane2('he' )Plane2.alive() oP2.name oP2.logo oP2.speed()
总:
1 class 的构造函数必须 new
2 在 constructor 里必须使用 super()
3 extends 继承的是公有属性 和 静态属性,私有的通过给 constructor 传参来实现
4 Plane1.prototype 及 静态属性 不能枚举
模拟 Class 1 定义 Plane :
1
2
3
4
function Plane ( } new Plane()
2 必须 new 才能执行,没有 new 的话 this是window
1
2
3
4
5
function _classCallCheck (_this, _constructor ) if (! (_this instanceof _constructor) ) { throw "TypeError: Class constructor Plane cannot be invoked without 'new'" ; } };
3 若是按照1 中的方式定义函数,则是暴露在全局,所以用立即执行函数来定义
1
2
3
4
5
6
7
8
var Plane = (function ( function Plane (name ) _classCallCheck(this , Plane); } return Plane; })(); var oP = new Plane();
4 私有属性、公有属性、静态属性
1 2 3 4 5 6 7 8 9 10 11 12 13 14 15 16 17 18 19 20 21 22 23 24 25 26 27 28 29 30 31 32 33 34 35 36 37 38 39 40 41 42 43 44 45 46 47 48 function _createClass (_constructor, _prototypeProperties, _staticProperties ) if (_prototypeProperties) { _defineProperties(_constructor.prototype, _prototypeProperties); } if (_staticProperties) { _defineProperties(_constructor, _staticProperties); } } function _defineProperties (target, props ) props.forEach(function (ele ) Object .defineProperty(target, ele.key, { value: ele.value, writable: true , configurable: true }); }) } var Plane = (function ( function Plane (name ) _classCallCheck(this , Plane); this .name = name || '普通飞机' ; this .blood = 100 ; } _createClass(Plane, [ { key: 'fly' , value: function ( console .log('fly' ); } } ], [ { key: 'alive' , value: function ( return true ; } } ]); return Plane; })();
extends:
1
2
3
4
5
6
7
8
9
10
11
12
13
14
15
16
17
18
19
20
21
22
23
24
25
26
27
28
29
30
31
32
33
34
35
36
37
38
39
function _inherit (sub, sup ) Object .setPrototypeOf(sub.prototype, sup.prototype); } var AttackPlane = (function (Plane ) _inherit(AttackPlane, Plane); function AttackPlane (name ) _classCallCheck(this , Plane); var _this = this ; var that = Plane.call(_this, name); if (typeof that == 'object' ) { _this = that; } _this.logo = 'qi' ; return _this; }; _createClass(AttackPlane, [ { key: 'dan' , value: function ( console .log('biubiubiu' ); } } ], [ { key: 'alive' , value: function ( return true ; } } ]); return AttackPlane; })(Plane); var oAp = new AttackPlane();
ES7 - Class es7 中的 class 有些是高版本的浏览器也不支持,需要一些工具来降级才能用
静态属性、私有属性用的工具:
1 安装 :npm install @babel/plugin-proposal-decorators
2 配置:”plugins”: [ [“@babel/plugin-proposal-class-properties”, { “loose” : true }] ]
静态属性、私有属性的用法:
1
2
3
4
5
6
7
8
9
10
11
12
13
14
15
16
17
18
19
class Search static num = 10 ; constructor () { this .keyValue = '' ; } age = 18 getCount () { console .log('发送请求' ); } }; var oS = new Search();console .log(oS);
装饰器 :@decorator:
安装的降级工具:npm install @babel/plugin-proposal-decorators
配置:”plugins”: [ [“@babel/plugin-proposal-decorators”, { “legacy”: true }] ]
装饰器的例子:分别修饰私有属性、公有属性、类
1 2 3 4 5 6 7 8 9 10 11 12 13 14 15 16 17 18 19 20 21 22 23 24 25 26 27 28 29 30 31 32 33 34 35 36 37 38 39 40 class Search constructor () { this .keyValue = '' ; } @myReadOnly url = 'urlA-' ; @dealData('张三' ) getContent (a, b) { console .log('向' + this .url + '发送网络请求, 数据:' + this .keyValue, a, b); } }; function Skin (target ) target.aaa = 30 ; } function myReadOnly (proto, key, descriptor ) descriptor.writable = false ; descriptor.initializer = function ( return 6 ; } } function dealData (proto, key, descriptor ) console .log(proto, key, descriptor); let oldValue = descriptor.value; descriptor.value = function ( var urlB = 'urlB-' ; console .log('向' + urlB + '发送网络请求, 数据:' + this .keyValue); return oldValue.apply(this , arguments ); } }
修饰类:
1
2
3
4
5
6
7
8
9
10
11
12
13
14
15
16
17
18
@Skin class Search constructor () { this .keyValue = '' ; } @myReadOnly url = 'urlA-' ; @dealData('张三' ) getContent (a, b) { console .log('向' + this .url + '发送网络请求, 数据:' + this .keyValue, a, b); return 10 ; } }; function Skin (target ) target.aaa = 30 ; }
总:感觉 es7 掌握的还不够,还差很多,还需努力啊
Set Map 首先,set map 兼容性并不是很好
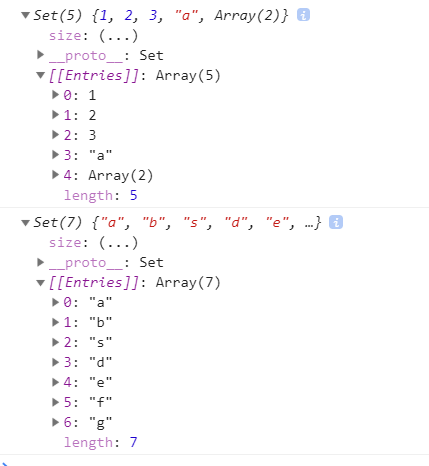
Set set 是es6提供的构造函数,用来存储数据的结构,当然用数组 对象也可以存储数据,但是有些时候实现某种功能会稍显麻烦,比如数组去重
定义:
参数是具备迭代接口的,如数组、对象、arguments
1
2
let oS = new Set ([1 , 2 , 3 , 1 , 'a' , [5 , 6 ]]) let oS2 = new Set ('absdefg' )
这两个值是这样的:
增、删、枚举、清空、包含:
1
2
3
4
5
6
7
8
9
10
11
12
13
14
15
16
17
18
19
20
21
22
23
let obj = { name: 'he' } let oS = new Set ([1 , 2 , 3 , 1 , 'a' , [5 , 6 ]])oS.add(1 ) oS.add(obj) oS.delete(obj) oS.has(1 ) oS.forEach( value => console .log(value) }) for (let value of oS) { console .log(value) } oS.clear() console .log(oS)
数组 与 Set 互相转换:
1
2
3
4
5
6
let arr = [1 , 2 , 3 , 4 ]let oS = new Set (arr)let newArr1 = Array .from(oS)let newArr2 = [...oS]console .log(newArr1, newArr2)
两个数组的 交集、并集、差集:
1
2
3
4
5
6
7
8
9
10
11
12
13
14
15
let arr1 = [1 , 2 , 3 , 4 ]let arr2 = [3 , 4 , 5 , 6 ]let oS1 = new Set ([...arr1, ...arr2])let oS2 = new Set (arr1)let oS3 = new Set (arr2)let newArr1 = [...oS2].filter((ele, index ) => oS3.has(ele))let newArr2 = [...oS2].filter((ele, index ) => !oS3.has(ele))let newArr3 = [...oS3].filter((ele, index ) => !oS2.has(ele))let newArr4 = [...newArr2, ...newArr3]
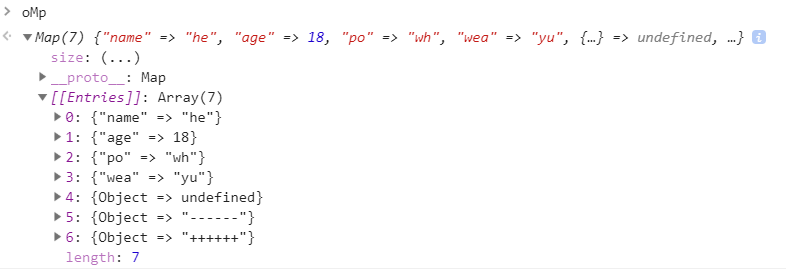
Map map 同样是 es6 提供的构造函数,能够存储数据,本质上是键值对的集合。
定义:
1 let oMp = new Map ([['name' , 'he' ],['age' , 18 ], ['po' , 'wh' ]])
它的结构是这样的:
增、查、删、包含、枚举、清空、长度:
1
2
3
4
5
6
7
8
9
10
11
12
13
14
15
16
17
18
19
20
21
22
23
24
25
26
27
let oMp = new Map ([['name' , 'he' ],['age' , 18 ], ['po' , 'wh' ]])let obj = { name: 'qi' } oMp.set('wea' , 'yu' ) oMp.set(obj) oMp.set({}, '------' ) oMp.set({}, '++++++' ) oMp.get('name' ) oMp.forEach((value, index ) => { console .log(value) }) for (let val of oMp) { console .log(val) } oMp.has('name' ) oMp.delete('name' ) oMp.delete(obj) oMp.delete({}) oMp.clear() oMp.size
链表、hashsuanfa、桶 链表:
1
2
3
4
5
6
7
8
9
10
11
12
13
14
15
16
17
18
{} {} {} {} {} let node3 = { key: 'name3' , value: '3' , next: null }; let node2 = { key: 'name2' , value: '2' , next: node3 }; let node1 = { key: 'name' , value: '1' , next: node2 };
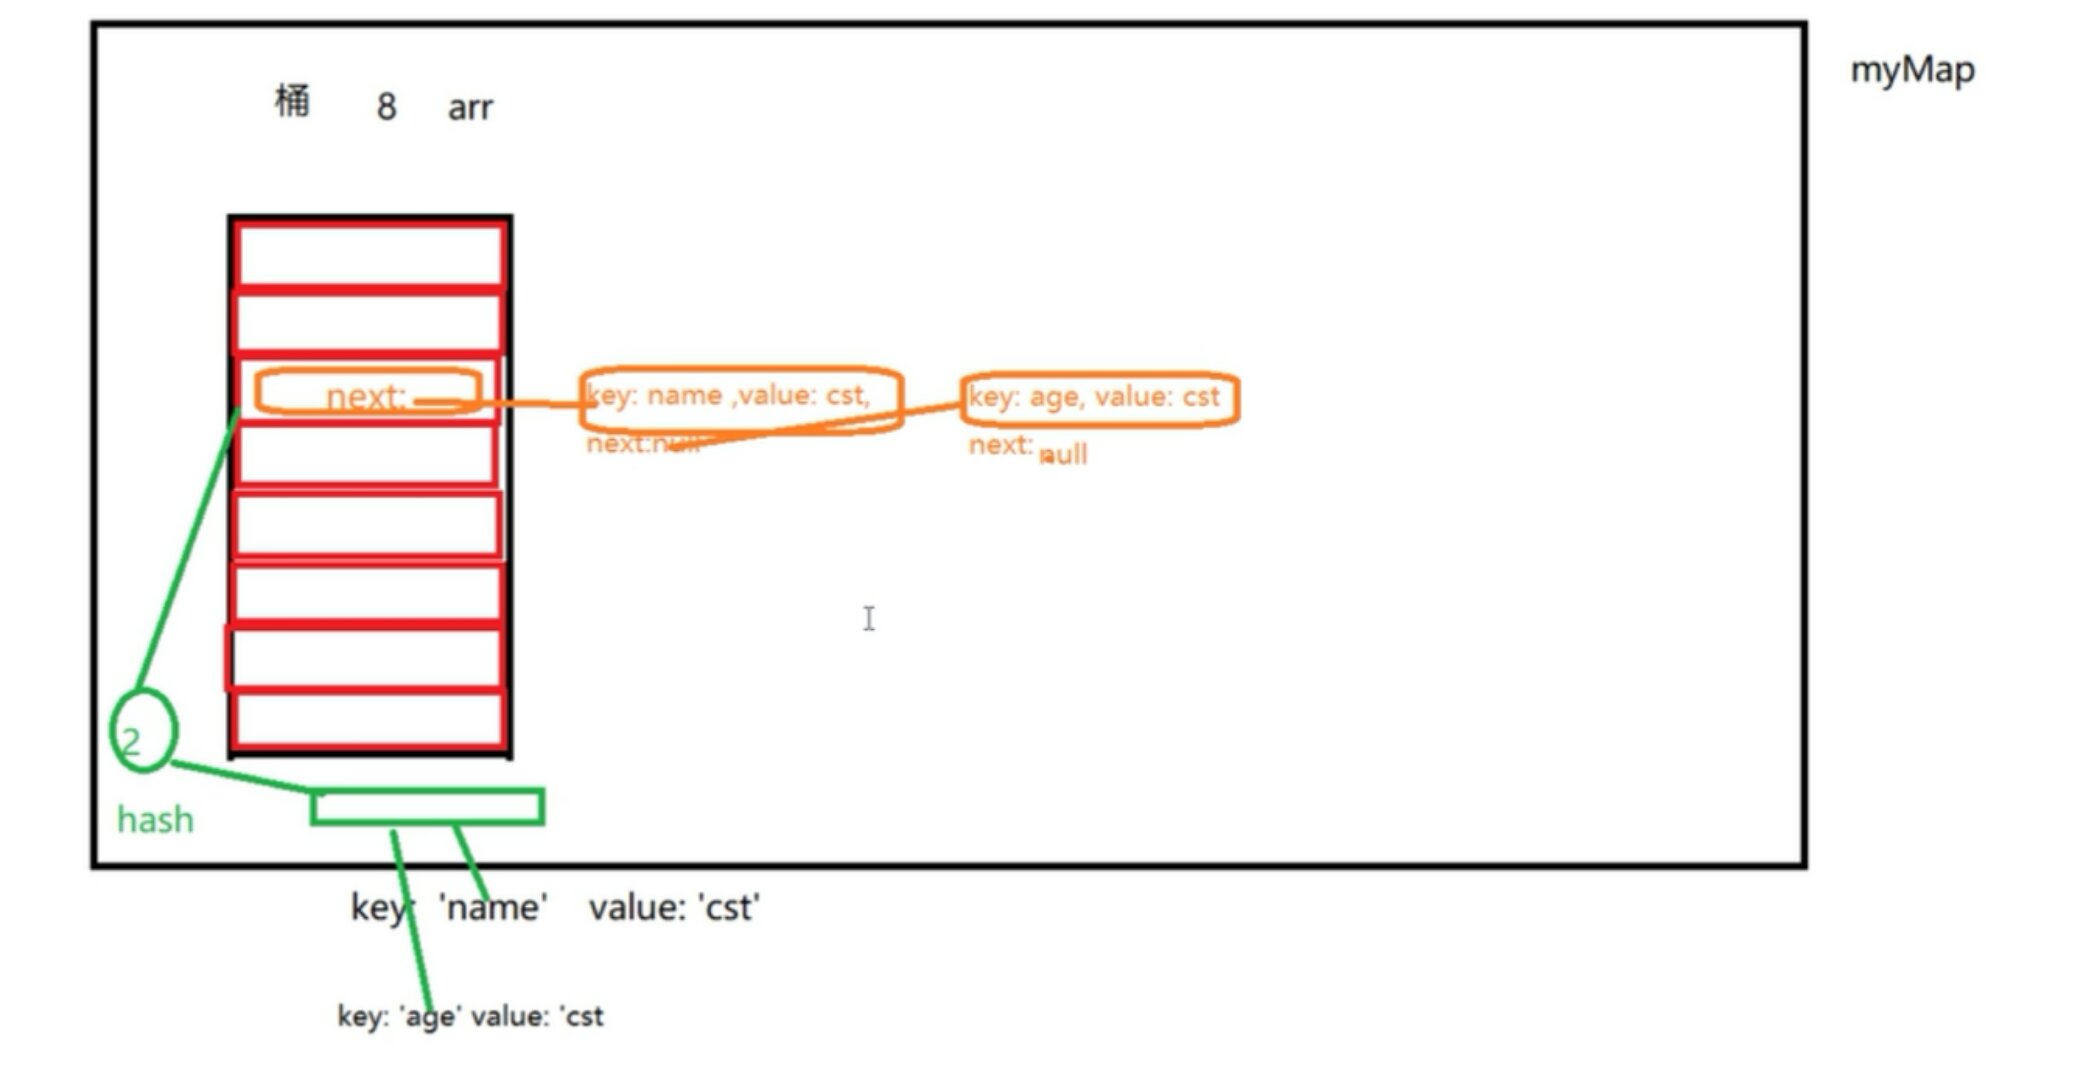
hash 、桶:
1
2
3
4
let oMp = new Map ([['name1' , '1' ], ['name2' , '2' ]]);
hash: 就是把不定范围的值转化成特定范围的
桶:就是容器(具体的我描述不出来)
1 2 3 4 5 6 7 8 9 10 11 12 13 14 15 16 17 18 19 20 21 22 23 24 25 26 27 28 29 30 { key: 'name1' , value: '1' , } { key: 'name2' , value: '2' , } [ { next: { key: 'name1' , value: '1' , next: { key: 'name2' , value: '2' } } }, {}, {}, {}, {}, {}, {}, {} ];
大体的图是这样的:
模拟 Map map有一下几个特点:
1 不重复
2 字符串 对象 NaN null [] function(){} 10
3 set get delete has clear
模拟过程如下:
1
2
3
4
5
6
7
8
9
10
11
12
13
14
15
16
17
18
19
20
21
22
23
24
25
26
27
28
29
30
31
32
33
34
35
36
37
38
39
40
41
42
43
44
45
46
47
48
49
50
51
52
53
54
55
56
57
58
59
60
61
62
63
64
65
66
67
68
69
70
71
72
73
74
75
76
77
78
79
80
81
82
83
84
85
86
87
88
89
90
91
92
93
94
95
96
97
98
99
100
101
102
103
104
105
106
107
108
109
110
111
112
113
114
115
116
117
118
119
function myMap ( this .bucketLength = 8 ; this .init(); } myMap.prototype.init = function ( this .bucket = new Array ( this .bucketLength ); for (var i = 0 ; i < this .bucket.length; i++) { this .bucket[i] = { type: 'bucket_' + i, next: null } } } myMap.prototype.makeHash = function (key ) let hash = 0 ; if (typeof key !== 'string' ) { if (typeof key == 'number' ) { hash = Object .is(key, NaN ) ? 0 : key; }else if (typeof key == 'object' ) { hash = 1 ; }else if (typeof key == 'boolean' ) { hash = Number (key); }else { hash = 2 ; } }else { for (let i = 0 ; i < 3 ; i++) { hash += key[i] ? key[i].charCodeAt(0 ) : 0 ; } } return hash % 8 ; } myMap.prototype.set = function (key, value ) let hash = this .makeHash(key); let oTempBucket = this .bucket[hash]; while (oTempBucket.next) { if (oTempBucket.next.key == key) { oTempBucket.next.value = value; return ; }else { oTempBucket = oTempBucket.next; } }; oTempBucket.next = { key: key, value: value, next: null }; } myMap.prototype.get = function (key ) let hash = this .makeHash(key); let oTempBucket = this .bucket[hash]; while (oTempBucket) { if (oTempBucket.key == key) { return oTempBucket.value; }else { oTempBucket = oTempBucket.next; } } return undefined ; } myMap.prototype.delete = function (key ) let hash = this .makeHash(key); let oTempBucket = this .bucket[hash]; while (oTempBucket.next) { if (oTempBucket.next.key == key) { oTempBucket.next = oTempBucket.next.next; return true ; }else { oTempBucket = oTempBucket.next; } } return false ; } myMap.prototype.has = function (key ) let hash = this .makeHash(key); let oTempBucket = this .bucket[hash]; while (oTempBucket) { if (oTempBucket.next && oTempBucket.next.key == key) { return true ; }else { oTempBucket = oTempBucket.next; } } return false ; }; myMap.prototype.clear = function (key ) this .init(); }; let oMp = new myMap();let obj1 = { name: 'cst' } oMp.set('name1' , 'he' ); oMp.set('name2' , 'qi' ); oMp.set(obj1, '---' ); oMp.set(obj1, '+++' ); oMp.set(function (true );
总:这个过程适合反复练习
Promise promise 是一个内置的构造函数
promise 基本使用: then 注册函数返回值 1 2 3 4 5 6 7 8 9 10 11 12 13 14 15 16 17 18 19 20 setTimeout(() => console .log('settime' ) }, 0 ); let oP = new Promise ((resolve, refect ) => { setTimeout(() => Math .random() * 100 > 60 ? resolve('ok' ) : refect('no' ) }, 600 ); }) console .log(0 )oP.then( (val ) => { console .log(val) }, (reason) => { console .log(reason) } ) console .log(1 )
在 then 中成功的回调和失败的回调有几个特点,如下代码:
1 可以链式调用
2 若是没有抛出错误那下一个 then 调用的是成功的回调,若是抛出错误了则是错误的回调,无所谓当前调用的回调是成功还是失败,只关心回调有没有抛出错误
3 若回调 return 的是 promise,则看这个 promise 是调用成功还是错误的回调
1 2 3 4 5 6 7 8 9 10 11 12 13 14 15 16 17 18 19 20 21 22 23 let oP = new Promise((resolve, refect) => { setTimeout(() => { Math.random() * 100 > 60 ? resolve('ok' ) : refect('no' ) }, 600 ); }) oP.then( (res) => { console.log(res) }, (rej) => { console.log(rej) throw new Error('he' ) }).then( (res) => { console.log('ok: then: ' + res) }, (rej) => { console.log('no: then: ' + rej) })
catch 异常捕获 finally 最后处理函数 then 捕获到错误后不再执行catch,但catch捕获到错误后会执行then;链式调用的时候如果写一个空then其实相当于不存在可以忽视
1 2 3 4 5 6 7 8 9 10 11 12 13 14 15 16 17 18 19 20 21 22 23 24 25 26 27 28 29 30 31 32 33 34 35 36 37 38 let oP = new Promise ((resolve, refect ) => { setTimeout(() => Math .random() * 100 > 60 ? resolve('ok' ) : refect('no' ) }, 600 ); }) oP.then( (res ) => { console .log(res) throw new Error ('qi' ) }, rej => { console .log(rej) throw new Error ('he' ) } ).then().then( (res ) => { console .log('ok-then: ' + res) }, rej => { console .log('no-then: ' + rej) } ).catch( err => console .log( err) } ) oP.then( (res ) => { console .log(res) throw new Error ('qi' ) }, rej => { console .log(rej) throw new Error ('he' ) } ).then().then( () => }).catch( err => console .log( err) } ).then( (res ) => { console .log('catch后-ok: ' + res) }, rej => { console .log('catch后-no:' + rej) } )
finally 终结:
1 2 3 4 5 6 7 8 9 10 11 12 13 14 15 16 17 oP.then( (res ) => { console .log(res) throw new Error ('qi' ) }, rej => { console .log(rej) throw new Error ('he' ) } ).then().then( () => }).catch( err => console .log( err) } ).then( (res ) => { console .log('catch后-ok: ' + res) }, rej => { console .log('catch后-no:' + rej) } ).finally( () => console .log('over' ) } )
Promise.all Promise.race Promise.all :同步并发异步结果。Promise.all可以将多个Promise实例包装成一个新的Promise实例。同时,成功和失败的返回值是不同的,都成功的时候返回的是一个结果数组(调用成功的回调),而失败的时候则返回最先被reject失败状态的值。
1 2 3 4 5 6 7 8 9 10 11 12 13 function test (x ) return new Promise ((res, rej ) => { setTimeout(() => Math .random() * 100 > 50 ? res(x) : rej(x); }, 100 ) }); } let oP = Promise .all([test('a' ), test('b' ), test('c' )]);oP.then((val ) => { console .log(val) }, (reason) => { console .log(reason); });
Promise.race:谁先处理成功就处理谁。Promise.race([p1, p2, p3])里面哪个结果获得的快,就返回那个结果, 不管结果本身是成功状态还是失败状态。有一个失败就触发失败
1 2 3 4 5 6 7 8 9 10 11 12 function test (x ) return new Promise ((res, rej ) => { setTimeout(() => Math .random() * 100 > 50 ? res(x) : rej(x); }, 100 ) }); } Promise .race([test('a' ), test('b' ), test('c' )]).then((val ) => { console .log(val, 'ok' ); }, (reason) => { console .log(reason, 'no' ); });
Promise 原理 then 的用法及要求可以在这个网站看,很合适 Promise A+规范
算了,上代码吧,这里适合多次 练习
1 2 3 4 5 6 7 8 9 10 11 12 13 14 15 16 17 18 19 20 21 22 23 24 25 26 27 28 29 30 31 32 33 34 35 36 37 38 39 40 41 42 43 44 45 46 47 48 49 50 51 52 53 54 55 56 57 58 59 60 61 62 63 64 65 66 67 68 69 70 71 72 73 74 75 76 77 78 79 80 81 82 83 84 85 86 87 88 89 90 91 92 93 94 95 96 97 98 99 100 101 102 103 104 105 106 107 108 109 110 111 112 113 114 115 116 117 118 119 120 121 122 123 124 125 126 127 128 129 130 131 let oP = new MyPromise( (res, rej ) => { res(1 ); }); function MyPromise (executor ) var self = this ; self.status = 'pending' ; self.resolveValue = null ; self.rejectReason = null ; self.ResolveCallBackList = []; self.RejectCallBackList = []; function resolve (value ) if (self.status === 'pending' ) { self.status = 'Fulfilled' ; self.resolveValue = value; self.ResolveCallBackList.forEach(function (ele ) ele(); }); } } function reject (reason ) if (self.status === 'pending' ) { self.status = 'Rejected' ; self.rejectReason = reason; self.RejectCallBackList.forEach(function (ele ) ele(); }); } } try { executor(resolve, reject); }catch (e) { reject(e); } }; function ResolutionRetrunPromise (nextPromise, returnValue, res, rej ) if (returnValue instanceof MyPromise) { returnValue.then(function (val ) res(val); }, function (reason ) rej(reason) }); }else { res(returnValue); } } MyPromise.prototype.then = function (onFulfilled, onRejected ) if (!onFulfilled) { onFulfilled = function (val ) return val; } } if (!onRejected) { onRejected = function (reason ) throw new Error (reason); } } var self = this ; var nextPromise = new MyPromise(function (res, rej ) if (self.status === 'Fulfilled' ) { setTimeout(function ( try { var nextResolveValue = onFulfilled(self.resolveValue); ResolutionRetrunPromise(nextPromise, nextResolveValue, res, rej); }catch (e) { rej(e); } }, 0 ); } if (self.status === 'Rejected' ) { setTimeout(function ( try { var nextRejectValue = onRejected(self.rejectReason); ResolutionRetrunPromise(nextPromise, nextRejectValue, res, rej); }catch (e) { rej(e); } }, 0 ); } if (self.status === 'pending' ) { self.ResolveCallBackList.push(function ( try { var nextResolveValue = onFulfilled(self.resolveValue); ResolutionRetrunPromise(nextPromise, nextResolveValue, res, rej); }catch (e) { rej(e); } }); self.RejectCallBackList.push(function ( setTimeout(function ( try { var nextRejectValue = onRejected(self.rejectReason); ResolutionRetrunPromise(nextPromise, nextRejectValue, res, rej); }catch (e) { rej(e); } }, 0 ); }); } }); return nextPromise; }; MyPromise.race = function (promiseArr ) return new MyPromise(function (resolve, reject ) promiseArr.forEach(function (promise, index ) promise.then(resolve, reject); }); }); };
Iterator 迭代模式:
迭代器简介:
内部迭代器:本身是函数,该函数内部定义好迭代规则,完全接手整个迭代过程,外部只需要一次初始调用。
外部迭代器:本身是函数,执行返回迭代对象,迭代下一个元素必须显示调用,调用复杂度增加,但灵活性增强。
如:function outerItreator(){} 外部迭代器
能够被迭代的数据,其原型上有 Symbol.iterator,如数组 arguments 等
对象上是没有这个属性的,但是我们可以给它加上:
1 2 3 4 5 6 7 8 9 10 11 12 13 14 15 16 17 18 19 20 21 22 23 24 25 let obj = { 0 : 'a' , 1 : 'b' , 2 : 'c' , length: 3 , [Symbol .iterator]: function ( let curIndex = 0 ; let next = () => return { value: this [curIndex], done: this .length == ++curIndex, } } return { next } } }; let arr = [1 , 2 ]console .log([...obj]);for (let p of obj) { console .log(p) };
####
Symbol 第七种数据结构 Symbol。特点是具有唯一性
例子:
1 2 3 4 5 6 7 8 9 10 11 12 13 14 15 16 17 18 19 20 21 22 23 24 25 let os = Symbol ('abc' );console .log(os);let os2 = Symbol ({ name: 'cst' , toString: function ( return 'qi' } }); console .log(os2);let os2 = Symbol ('abc' ); let prop = 'name' ;let obj = { [os2]: 'cst2' , [os]: 'cst' } console .log( Symbol .iterator , Symbol ('Symbol.iterator' ));
ES6 - Generator genarator 是迭代生成器。本身是函数,执行后返回迭代对象,函数内部要配合yield使
generator 特点:
1 function和函数名之间需要带 *
2 函数体内部yield表达式,产出不同的内部状态(值)
1 2 3 4 5 6 7 8 9 10 11 12 13 14 15 16 17 18 19 20 21 22 23 24 25 26 27 28 29 30 31 32 33 34 35 36 37 38 39 function *test ( yield 'a' ; console .log('1' ); yield 'b' ; console .log('2' ); yield 'c' ; console .log('3' ); return 'd' ; } let oG = test();console .log( oG.next() );console .log( oG.next() );console .log( oG.next() );console .log( oG.next() );function *test ( let value1 = yield 'a' ; console .log(value1); let value2 = yield 'b' ; console .log(value2); let value3 = yield 'c' ; console .log(value3); return 'd' ; } let oG = test();console .log( oG.next('yi' ) ); oG.next('qi' ); oG.next('he' ); oG.next('mu' );
总:上面代码中最后打印的内容 取决于next()中传的东西,而不是产出的东西
迭代器代码修改:
1
2
3
4
5
6
7
8
9
10
11
12
13
14
iterator函数的目的 执行返回可以迭代的对象 let obj = { 0 : 'a' , 1 : 'b' , 2 : 'c' , length: 3 , [Symbol .iterator]: function *( let currIndex = 0 ; while (currIndex != this .length) { yield this [currIndex]; currIndex++; } } };