vue 中 对 input 包装了一些方法,有一些很方便,如v-model 双向数据绑定,还有 v-on:input, 也可以写成@input ,而 v-model = 'inpVal' 行为类似于 @input='inpVal=$event.target.value'
假设是做搜索效果,若是检测到 input 有输入就搜索,那可以采用下面这种,监听 v-model 的变化:
1
2
| <input type="text" placeholder="搜索" v-model="inputValue" @focus="hwSearchFocus($event)"
@blur.prevent="hwLostFocus()" @keyup.enter="searchAllClick">
|
若是检测到键盘有所变化就搜索,则可以采用下面这种:
1
| <input type="text" @keyup.enter="enterToSearch" @blur="lostFocus" @keyup="searchInput" @keydown="searchClear">
|
1 @keyup:监听键盘的动向,哪怕此时没有输入到input中
2 @keyup.enter:回车事件
3 @focus:input 框获得焦点
4 @blur:input 框失去焦点
5 v-model:input 框数据双向绑定,可以在 watch 中检测到 input 的 value 的变化
6 @input:监听 input 中的 value 的变化
综上:如果在做搜索框时,要求键盘只要有变化就搜索那就采用键盘的监听事件keyup,要是要求input的值有变化才搜索,那就采用@input或是在watch中监控v-model
搜索框
现在要求一个搜索框,当搜索框有焦点但框内没有内容时显示热门搜素,在搜索框的值有变化且有值时去搜索数据,搜索出的内容显示在下面,并把当前搜索值变兰色
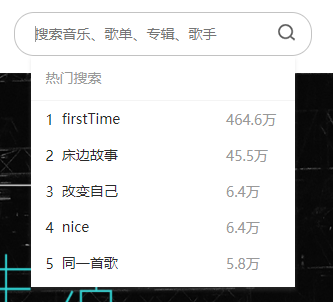
这里采用在 watch 中监听 v-model 的值得方式
input框:
1
2
3
4
5
6
7
8
9
| <input type="text" placeholder="搜索音乐、歌单、专辑、歌手" v-model="inputValue" @focus="hwSearchFocus($event)"
@blur.prevent="hwLostFocus()"
@keyup.enter="searchAllClick">
<!-- 搜索内容: input有值 -->
<div ref="hwSearShow">搜索内容显示</div>
<!-- 搜索内容:input内容为空 -->
<div ref="hwSearShowNull">热门搜索</div>
|
当获得焦点但无搜索值时,监听 focus 方法:
1
2
3
4
5
6
7
8
9
10
11
12
13
14
15
16
17
18
19
20
21
22
23
24
25
26
27
| hwSearchFocus(e) {
if (this.inputValue) {
} else {
this.historyResult();
}
console.log('focus');
},
historyResult() {
this.axios({
method: 'POST',
url: this.$store.state.siteStr + 'WEB'
}).then(res => {
if (res.data.errCode === '0001') {
this.hwSearchNull = res.data.data.hotSongs.splice(0, 5);
for (var i = 0; i < 5; i++) {
this.hwSearchNull[i].searchedTimes = this.hwSearchNull[i].searchedTimes > 9999 ? Math.floor(this.hwSearchNull[
i].searchedTimes / 10000 * 10) / 10 + '万' : num
}
}
}).catch(err => {
console.log(err)
})
this.$refs.hwSearShowNull.style.display = 'inline-block';
},
|
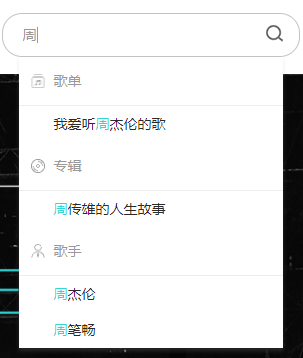
当搜索有焦点,且有输入时, 显示搜索内容并把搜索词变兰色:
1
2
3
4
5
6
7
8
9
10
11
12
13
14
15
16
17
18
19
20
21
22
23
24
25
26
27
28
29
30
31
32
33
34
35
36
37
38
39
40
41
42
43
44
45
46
47
48
49
50
51
| hwSearchFocus(e) {
this.inputLostFocusBool = '';
if (this.inputValue) {
this.querySearchResult(this.inputValue);
this.$refs.hwSearShow.style.display = "inline-block";
this.searchKNullShowBool = '';
this.$refs.hwSearShowNull.style.display = 'none';
} else {
this.historyResult();
}
},
querySearchResult(newVal) {
this.unformatSongName = [];
this.axios({
method: "POST",
url: this.$store.state.siteStr + "WEB",
data: this.qs.stringify({
searchName: newVal,
num: 5
})
}).then(res => {
this.$refs.hwSearShow.style.display = "inline-block";
this.reg = eval("/(" + newVal + ")/gi");
this.searchInfo = res.data.data;
if (this.searchInfo.SongListInfo.length > 0) {
this.$refs.serachSongEle.style.display = "block";
this.hwSearchSong = this.searchInfo.SongListInfo;
if (this.hwSearchSong.length === 1) {
this.songN = 1;
} else if (this.hwSearchSong.length < 4) {
this.songN = this.hwSearchSong.length;
} else {
this.songN = 4;
}
for (var i = 0; i < this.songN; i++) {
this.unformatSongName.push(this.hwSearchSong[i].songName);
this.songNameArr = this.hwSearchSong[i].songName.split(this.reg);
this.hwSearchSong[i].songNameF = this.songNameArr;
}
} else {
this.$refs.serachSongEle.style.display = "none";
}
}).catch(err => {
console.log(err);
});
},
|
当input 失去焦点:
1
2
3
4
5
6
7
8
|
hwLostFocus(e) {
if ((this.searchKShowBool === '') && (this.searchKNullShowBool === '')) {
this.$refs.hwSearShow.style.display = "none";
this.$refs.hwSearShowNull.style.display = 'none';
}
this.inputLostFocusBool = true;
},
|
实时监听input的值得变化,这里要注意当我逐个减少input的内容时,是可以达到input有焦点且无搜索值的情况,所以也要注意这点:
1
2
3
4
5
6
7
8
9
10
11
12
13
14
| watch: {
inputValue(newVal, oldVal) {
this.searchResultBool = '';
if (newVal === "") {
this.searchKShowBool = '';
this.$refs.hwSearShow.style.display = "none";
this.historyResult();
return;
}
this.querySearchResult(newVal);
this.searchKNullShowBool = '';
this.$refs.hwSearShowNull.style.display = 'none';
},
},
|
性别选择
有时会用到用户性别选择的功能,这里实现下这个小功能

可以用 input radio 来实现(或者用v-for 和 v-model 来配合使用):
1
2
3
| <input type="radio" name="sexSelect">男
<input type="radio" name="sexSelect">女
<input type="radio" name="sexSelect">保密
|
但现在蓝湖上在圆点和性别中间有一些距离,然后暂时没找到调这个距离的方法,所以我在这里套了一个span,但目前不知道对不对,如下:
1
2
3
4
5
6
7
8
9
10
11
12
13
14
15
16
17
18
19
20
21
22
23
24
25
26
27
28
29
30
31
32
| sexSelected: [{
value: '男',
ischeck: false
}, {
value: '女',
ischeck: true
}, {
value: '保密',
ischeck: false
}],
<input type="radio" class="perMsgChange-sexI" name="sexSelect" :checked="sexSelected[0].ischeck" @change="sexChange(0)"><span
class="perMsgChange-sexSelName">男</span>
<input type="radio" class="perMsgChange-sexI" name="sexSelect" :checked="sexSelected[1].ischeck" @change="sexChange(1)"><span
class="perMsgChange-sexSelName">女</span>
<input type="radio" class="perMsgChange-sexI" name="sexSelect" :checked="sexSelected[2].ischeck" @change="sexChange(2)"><span
class="perMsgChange-sexSelName">保密</span>
sexChange(ind) {
this.nowSexInd = ind;
this.sexOrigin(ind)
},
sexOrigin(num) {
for (var i = 0; i < 3; i++) {
this.sexSelected[i].ischeck = false;
}
this.sexSelected[num].ischeck = true;
},
this.sexStr = this.sexSelected[this.nowSexInd].value;
|
但套了span后发现,当选中某个 input 时并不能根据ischeck的value 等方式获取到值,所以这里定义一个数组,然后去改变这个数组中的值
与label配合上传图片
对于上传图片这个功能,可以用 input 和 label 配合
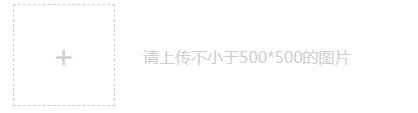
这里只写部分结构,给label设置for属性,指向input:
1
2
3
4
|
<label for="upsongImg" class="perCont-myWorks-addImgL"></label>
<input id="upsongImg" class="perCont-myWorks-addImgI" type="file" accept="image/JPG, image/png, image/JPEG" ref="inp"
@change="songImg">
|
将input 设置left:-9999px,达到在页面上看不到的效果:
1
2
3
4
5
6
7
8
9
10
11
12
13
14
15
16
17
18
| .perCont-myWorks-addImgL {
position: absolute;
top: 0px;
right: 0px;
bottom: 0px;
left: 74px;
width: 102px;
height: 102px;
z-index: 10;
cursor: pointer;
margin-bottom: 0px;
}
.perCont-myWorks-addImgI {
position: absolute;
left: -9999px;
width: 102px;
}
|
点击label,选择图片:
1
2
3
4
5
6
7
8
9
10
11
12
13
14
15
16
17
18
19
20
21
22
23
24
|
songImg(e) {
let that = this;
let file = e.target.files[0];
let imgSize = file.size / 1024;
let fileName = file.name;
if (imgSize > 10240) {
alert("请上传不大于10M的图片");
} else {
let render = new FileReader();
render.readAsDataURL(file);
render.onloadend = function () {
that.upSongImg = render.result;
that.$refs.addSongImgEle.style.display = "none";
that.$refs.songImgEle.src = that.upSongImg;
that.songimgfile = file;
};
}
},
|
当上传的文件图片较多或是较大时,与后台的传输采用 formdata 的方式可能更好:
1
2
3
4
5
6
7
8
9
10
11
12
13
| let paramform = new FormData();
paramform.append('songimgfile', this.songimgfile);
this.axios({
method: "post",
url: this.$store.state.siteStr + "WEB",
data: paramform
}).then(res => {
console.log(res.data);
}).catch(err => {
console.log(err);
});
|
以上就是利用 input 和 label 配合使用上传图片的例子,也可以用来上传文件等